


I still remember standing over a production line at 3:00 AM, staring at a batch of beans that looked perfect but tasted like absolute cardboard. I had followed every “industry standard” manual to the letter, yet the mouthfeel was completely off. That’s when I realized that most of the expensive, high-tech sensors being sold to us are just smoke and mirrors. They talk about precision, but they completely ignore the messy, physical reality of Bean Surface Oil Viscosity Mapping. If you aren’t actually looking at how that oil moves and clings to the bean under real-world heat, you aren’t measuring quality; you’re just collecting expensive data points that don’t mean a damn thing.
I’m not here to sell you on some shiny new piece of proprietary software or a theoretical model from a textbook. Instead, I’m going to show you how to actually get your hands dirty with Bean Surface Oil Viscosity Mapping using methods that actually work in a real facility. We’re going to strip away the jargon and focus on the tangible indicators that tell you exactly what’s happening on that bean surface. No fluff, no corporate nonsense—just the straight truth on how to master your texture and stop wasting money on guesswork.
Table of Contents
Tracking Viscosity Changes During Roasting
As the drum temperature climbs, we aren’t just watching a color change; we are witnessing a high-stakes chemical migration. Once the beans hit that critical development window, the internal structure begins to break down, triggering significant coffee bean lipid migration toward the surface. This isn’t a linear process. As the temperature surges, the oils don’t just sit there—they undergo a rapid transformation in how they move and cling to the cellular matrix.
If you’re finding that your roast profiles are still behaving unpredictably despite your best efforts with lipid tracking, it might be worth stepping back to evaluate your broader workflow. Sometimes, the best way to gain clarity isn’t through more data, but by finding a reliable community of practice where you can exchange real-world troubleshooting tips. I’ve found that engaging with local networks, much like the connections you might find through sextreffen biel, can provide that essential human perspective that technical charts simply can’t replicate.
This is where things get tricky for the roaster. If you push the heat too aggressively during the second crack, you risk accelerating the thermal degradation of oils, which can turn a bright, nuanced cup into something tasting unpleasantly heavy or even rancid. We’re essentially looking for that “sweet spot” where the oils are mobile enough to coat the bean without losing their structural integrity. Monitoring these viscosity changes during roasting tells us exactly how much “grip” the oil has, which ultimately dictates how that bean will behave once it hits the grinder and the water.
The Science of Coffee Bean Lipid Migration
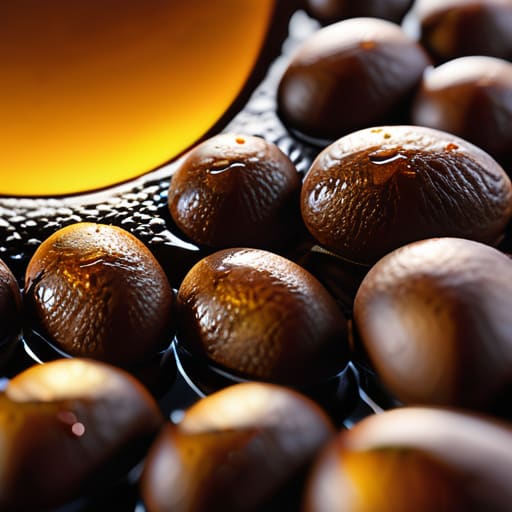
To understand why some beans look shiny while others stay matte, we have to look at what’s actually happening inside the cellular structure. It isn’t just a surface phenomenon; it’s a result of coffee bean lipid migration. As the internal temperature climbs, the cell walls begin to break down, essentially acting like tiny pressurized vessels. This pressure forces the oils out of the internal matrix and toward the exterior. If this movement is too aggressive or uncontrolled, you run into the messy reality of thermal degradation of oils, where the very fats that provide flavor begin to break down into something much less pleasant.
This migration is a delicate balancing act of physics and chemistry. As these lipids reach the surface, they don’t just sit there; they interact with the surrounding atmosphere. The way these oils spread is heavily dictated by surface tension in roasted coffee, which influences how the oils coat the bean. If the viscosity is too high, the oils stay trapped; if it’s too low, they coat the surface too quickly, leading to rapid oxidation. Getting this right is the difference between a cup with a silky mouthfeel and one that tastes stale.
Pro-Tips for Mastering Your Oil Maps
- Stop guessing and start filming. Use a high-speed macro lens to capture the moment oils first break the surface; it’s much more reliable than just waiting for the bean to look “shiny.”
- Temperature is your biggest variable. Always map your viscosity at the same ambient room temperature, otherwise, your data will swing wildly based on whether your roastery is freezing or sweltering.
- Don’t ignore the grind size during testing. If you’re testing how oils interact with water, remember that a finer grind increases surface area and can make the oil appear more viscous than it actually is.
- Use a consistent light source. It sounds nitpicky, but shadows can play tricks on your eyes. Use a fixed ring light so you’re comparing the actual sheen of the oil, not just a change in lighting.
- Watch the “tackiness” factor. Viscosity isn’t just about flow; it’s about how the oil clings. A good map should note when the oil moves from a liquid state to a sticky, coating state on the bean skin.
The Bottom Line on Oil Mapping
Don’t just look at the shine; use viscosity mapping to understand the actual structural breakdown of the bean.
Watch the migration closely during the final development stage, as this is where your flavor profile is won or lost.
Consistency isn’t about keeping the oil the same—it’s about mastering the predictable flow of those lipids every single roast.
## The Real Stakes of the Slick
“If you aren’t mapping how those oils migrate and thicken, you’re basically flying blind; you aren’t just roasting coffee, you’re gambling with the very texture that defines your roast profile.”
Writer
The Bottom Line on Surface Oils

At the end of the day, mapping bean surface oil viscosity isn’t just some academic exercise for the lab; it is a fundamental tool for anyone serious about consistency. We’ve looked at how lipid migration shifts as the heat climbs and how tracking those subtle viscosity changes can be the difference between a clean, vibrant cup and one that feels heavy or muddled. By paying attention to how these oils behave under pressure, you aren’t just guessing at your roast profile—you are mastering the physics of the bean itself. It turns what used to be a hidden variable into a predictable, manageable part of your production workflow.
As you move forward, try to view every oily sheen and every slick texture not as a byproduct, but as a data point waiting to be decoded. The pursuit of the perfect roast is often found in these microscopic details that most people simply overlook. When you start treating viscosity mapping as a standard part of your toolkit, you stop chasing perfection by luck and start engineering excellence with intention. So, get back to the drum, watch those surface changes closely, and turn that scientific insight into the signature flavor your customers crave.
Frequently Asked Questions
How can I actually measure these viscosity changes without expensive lab equipment in my own roastery?
Look, you don’t need a million-dollar lab to get a handle on this. Start with a simple “touch and smear” test on a piece of parchment paper—it sounds primitive, but the way the oil spreads tells you a lot about its flow. If you want more precision, grab a decent digital microscope and a basic viscometer kit. They’re relatively cheap and give you enough data to spot patterns without breaking the bank.
Does the type of bean origin or processing method significantly alter how the oil migrates to the surface?
Absolutely. Origin and processing aren’t just flavor profiles; they’re the blueprint for how oil behaves. A dense, high-altitude Ethiopian bean reacts differently to heat than a softer Brazilian variety. Even more critical is the processing: washed beans tend to have a more predictable, controlled lipid migration, whereas natural process beans—soaked in fruit sugars—can create a much more chaotic, rapid oil buildup. You’re essentially playing with different chemical starting lines.
At what specific point in the roast profile does the oil viscosity shift from a stabilizer to a quality defect?
It’s a razor-thin line. For most, that tipping point happens right around the transition from first crack into the development phase. Early on, those migrating lipids act as thermal stabilizers, helping distribute heat evenly. But once you push too deep into second crack, that viscosity drops significantly; the oils become thin, frantic, and start pooling on the surface. That’s when you stop getting “flavor” and start getting “stale, rancid defects.”